This post may contain affiliate links, meaning I may receive a commission if you purchase through my links. I only recommend products I have personally tested or have thoroughly researched. All opinions are my own. Please read the full disclosure for more information.
Few people write checks anymore, but in some cases, it is necessary and more convenient.
Fortunately, writing a check is much easier than it might seem. Checks have many uses, and while some places no longer accept checks, others may require them.
I started using checks when I was 16, and while I don’t write them often, I do use them from time to time when there’s no cash on hand, or I am paying for a larger amount and can’t use a card. Also, they are great for when I would send my car payment from one bank to another, buy something from a vendor, or as gift money.
What are checks?
Checks are essentially blank cash. What this allows you to do is to write whatever amount you need to, and write it to whoever you need to. The amount can be a rounded number like $100, or it can even be exact change, such as $27.58. Your checks are linked directly to a checking account from your bank.
So when you write a check, it will be withdrawn straight from your account to the recipient. Essentially it’s like Venmo, but in paper form, for people or places who don’t accept Venmo.
Because checks are used so infrequently today, most places just take cash or cards and no longer have the scanners, or software in place to accept them. But, they are still used in some circumstances, and you don’t want to be left in the dark when it comes to knowing how to use them.
What’s on a check?
Checks will almost always contain the name of the checking account owner(s), or if the check is from a business it will contain that business name, business owner, CEO, or whoever has control over financials in the company. Additionally, checks may also contain an address, phone number, and occasionally an email.
However, this information will depend on personal preference when purchasing the checkbook or when getting it from your bank. This section is commonly in the left-hand corner of the check.
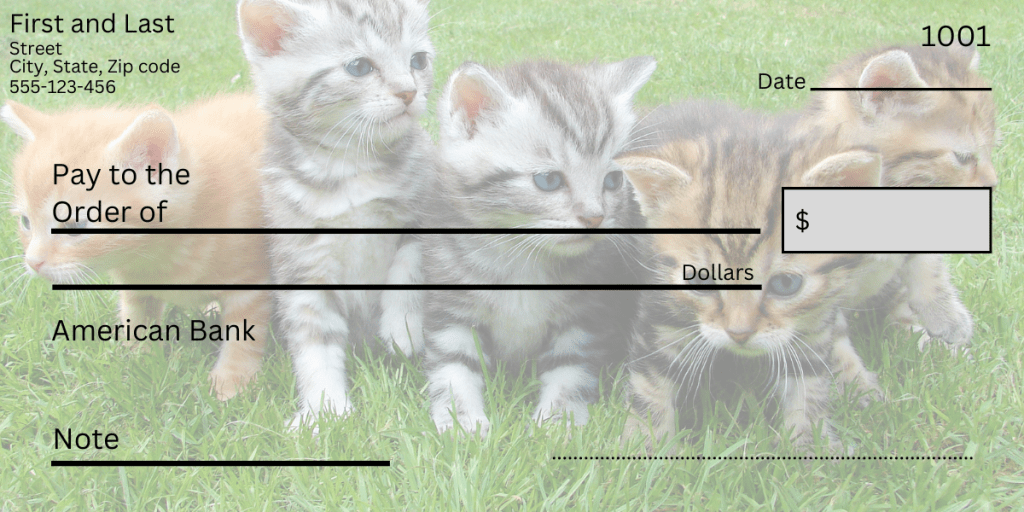
This example below is very generic and includes almost everything you will see on a check. At the top right corner you will see a number which is the “check number”. This will help you keep track of which check you wrote to whom.

The next important section is where you write the payment amount. This will show as a long line in the center of the check and might say something like “pay to the order of”.
1. Writing the check amount
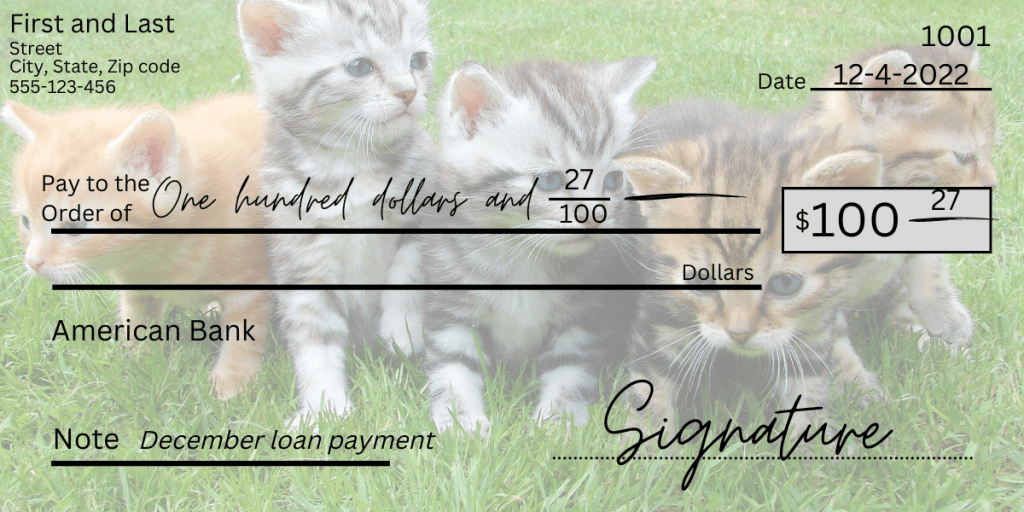
This long line (pay to the order of) is where you write the check amount, but mostly in words. So for example, one hundred dollars, and 27/100. The last part is for change, and it’s best practice to draw a straight line from the change amount to the end of the line (or space you have left on the line).
This can help prevent someone from trying to overcharge the amount you originally wrote by falsifying the check. This written section does not need to be in cursive. Many people who frequently write checks tend to stick to a cursive style of writing for this part, but it is not necessary.
After you have written out your check amount in words, you will need to write it out in numbers. You will see a blank box on the right-hand side of your check. This is where you write out your amount in numerics, 100 and 27/100.
2. Dating the check
This next part is the most simple step. After the check amount is written out, you will need to date the check. This is typically a mm/dd/yyyy format. The date section is at the top right of the check, and sometimes comes pre-filled with part of the year already printed for you, with something like _/_/20__.
3. Signing the check
After you have filled out the check amount and date, you will need to finish it off with your signature. Your signature has a designated line at the bottom right of the check. It’s important to leave this step for last.
The reason is that if you leave everything else blank except for your signature, you have essentially written a “blank check”. The problem with this is that if for some reason someone gets a hold of your ‘blank check’ they can write any amount on that check and cash it out for that amount. So it’s best to play it safe and leave this step for last.

There is sometimes another section for a Note, but this is not a required part of most checks unless the recipient specifically requests you do this. I often like to write the item I am purchasing or paying for as this will show up in my bank statements. I typically only write checks for my car payment, but I have also used checks for fundraisers, organizations, or buying items for school like T-shirts and uniforms.
What if I need to cash a check?
If you’ve never had to cash a check before, remember that you’re not the first person to come across this issue. Fewer and fewer people use checks, so it makes sense that fewer people know how to cash them.
So the front of your check will look like the picture above. The back of the check, however, will look quite a bit different. For most personal checks, you will see a dotted or pale line with about an inch and a half of space from one end. Typically it will say, “endorse here”. Unfortunately, not all checks will have the ‘endorse here’ written on it. But, most of the time that pale line will almost always be there.
In addition to the ‘endorse here’ section, you may also see a “do not write below this line”. So follow the instructions, and don’t write below the line. This usually voids the check, preventing you from cashing it, so avoiding this mistake will save you from a headache.
What if I want to use a mobile deposit with a check?
Same steps as you would take when endorsing a regular check, but if you see a small box that says “check here for mobile deposit”, you need to check mark that box, and/or write ‘for mobile deposit only’. Additionally you will want to write the date of deposit on the back of the check.
Unfortunately, not all banks or checks will offer this, so be aware of this before trying to endorse your check on mobile. You may need to check with your bank to make sure you’re eligible for this option.
After you have endorsed your check, follow your banking app’s steps through the mobile deposit process. Most of the time all this involves is scanning both sides of the check with your camera.
If you’re interested in other helpful financial tips, check out my Finance page with all of my finance related posts, or check out these posts here.