
This post may contain affiliate links, meaning I may receive a commission if you purchase through my links. I only recommend products I have personally tested or have thoroughly researched. All opinions are my own. Please read the full disclosure for more information.
Are you looking for ways to save tons of time creating Pinterest Pins?
I know this was something I struggled with when I first started creating new pins for my blog. And, over time through courses I’ve taken, and from my own experience, I’ve discovered some easy ways to cut back on the time it takes to create a new pin.
I promise it is a lot easier than you think to cut back on the time it takes to produce quality pins. So, give these tips a try and let me know what you think.
- Use the Native Pinterest Scheduler
- Use Pin Templates
- Switch up Pin Images
- Change Font Styles
- Adjust Elements
- Duplicate Pins
- Track Keywords
- Track Tags and Trends
Use the Pinterest Native Scheduler (it’s free!)
The best method of how to save pins on Pinterest is to use the Pinterest Native Scheduler.
Many bloggers will recommend using Tailwind as a way of saving yourself time and energy. And, while Tailwind can certainly make things easier, I would not suggest using this third-party scheduler until you have a well-established account. This can be as much as a few years of consistent pinning.
For beginners, Tailwind may save time, but it isn’t going to benefit your analytics as much as you might think. While Tailwind is a Pinterest-approved application, like many platforms, Pinterest too prefers its users to create content directly on its platform.
Plus, the Pinterest Native Scheduler doesn’t cost anything! You can schedule pins up to 30 days in advance, and keep up to 10 pins in draft ready to schedule.
One other neat thing I want to mention about the Native Pinterest Scheduler is that, unlike 3rd party platforms, you can include category tags for pins, and you can also edit the settings on all 10 draft pins at the same time.
This means you can add a title, description, link, board, and tags for all 10 of your pins at once. How much time do you think you would save if you did this one trick?
Use Pin Templates
Whether you find free Pinterest templates, purchase pin templates, or create your own, this can help save your hours every month during the creation process.
Trying to create a pin from scratch every time you need to make a new pin is exhausting, and it’s a great way to get burnt out.
You’ve probably heard of other bloggers using templates for their Pinterest accounts. And, it’s no wonder they do, because it saves valuable time that can better be spent creating new content.
I suggest starting with around 5-10 Pinterest templates and using those for a while, and then refreshing your look after a couple of months. Or as often as you want or need. That’s really up to you.
My favorite Pinterest templates are from a course I took from Carly Campbell called Pinteresting Strategies. In her course, she goes through the process of opening a new account, creating new boards, making new pins, and even optimizing the pins for Pinterest search.
Her course is comprehensive, and she speaks from personal experience. After taking her course I finally started to see noticeable growth in my impressions, and my outbound clicks. I started implementing her strategies around January and February.

Carly explains the what, the why, and the how of all things Pinterest strategy. Her strategies have not only worked when she started a new account, but it also works great for established accounts wanting to revamp their strategy.
I do want to mention though, that for any Pinterest strategy you use, it will take time before you see heavy regular, consistent traffic to your website. The key is consistency, and this is something that Carly really hits hard on in her course.
But, it may take as long as 8-9 months before you start seeing that heavy traffic to your site. This is just how the Pinterest algorithm works. This is pretty normal, and is really just how any type of search engine works.
If you are new to the Pinterest game, I would suggest starting off with 1 pin per day, and as you develop a routine, you can start increasing your pin publish rate. Just make sure that it is sustainable for you.
Sustainability is the most important thing here. If you can’t keep up with it, then it isn’t going to work regardless.
Is your Pinterest knowledge limited, or is your strategy just struggling? It may be time for a course.
When I finally decided it was time to learn from the professionals, I invested in the course Pinteresting Strategies, and have learned far more than I thought I would.
I definitely recommend taking a look at this course if you want to improve your Pinterest traffic.
Canva Tricks and Tips
Canva is one of the best free digital design tools available to content creators. And, it is also one of the easiest to use. But, my favorite part about this design software, is that it has some neat tricks that can save you tons of time when creating Pinterest pins.
I use Canva almost exclusively for pins, though I do enjoy making other digital designs. However, I have learned some neat tricks over time that have helped me make more pins in less time. Meaning, more time to write more blog posts!
Other posts you might be interested in
- 8 Simple Ways to Save Time and Money Creating Pinterest Pins on Canva
- Social Media Marketing In Business: Growth And Revenue
- What Skills Does a Digital Copywriter Need in 2023?
- The Only Legal Templates You Will Ever Need For Your Website and Business
- RankIQ Review: The Best SEO AI Tool For Bloggers To Rank (2023)
Change the Image
One of the simplest ways to completely change how a pin looks is to keep the text the same but change out the image you use.
Notice how the pin looks almost completely different with a new image? And, changing up the text gives it a refreshing look too.

I suggest using Deposit Photos for your Pinterest pin images. This is a paid stock photo site that often has great sales throughout the year. Black Friday is one of the best times to grab a deal on a stack of images.
You can pick any image, video, or other media when you want. So there’s no rush to decide which photos you want to use.
Aside from changing the image itself, you can also crop and move the photo however you want to on your pin. Changing the angle of the image, the cropping, and even flipping the image horizontally means a new pin.
You can have hundreds of pins with the same text, and all different images and image variations.
Change the Font or Text
There are hundreds of fonts to choose from in Canva. But, you are limited by finding a font that is still legible on a pin. So, even though you may be more limited by font choice, there are other ways to change up your words.
The Effects option gives you about 7 unique looks to change how a word looks. And, this doesn’t even include all of the color combinations, font sizes, and orientation options that can freshen things up.
Other than changing the way the text looks, you can also just change what it says. You can duplicate a pin and change what the words say, but still keep the font variations and effects the same.
Rearrange, Change, or Add Elements
There are hundreds of elements you can use in your pins. So when you decide to rearrange where an element is, like text and icons and such, you have created a new pin.
Adding in more elements can also be the beginning of new pins. Using arrows, shapes, and other graphics can bring more color to your pins. Just make sure you don’t overdo it. Use elements sparingly, and rearrange as necessary.
Adding in additional text can also be a great way to optimize your pins a bit more. The Pinterest algorithm can identify different aspects of pin design including text. So if you want to add in subtitles, this is a chance to include more keywords, or buzzwords to encourage clicks from your ideal audience.
If you use different shapes in your pin design, you can opt to change the color and transparency of the shape to create a whole new pin.
You can even use a Frame element and just choose a color for it, instead of adding in a picture. Or, use a colored frame behind an image frame for a more dynamic look.
Duplicate a Pin
You’ve probably already discovered how to duplicate a pin. But, have you used this trick to make a massive amount of pins at once?
After you duplicate a completed pin, you can use the other tricks and tips on Canva to create a brand new pin with a simple twist and change of fonts, images, elements, and colors.
Track Keywords, Tags, and Trends
Many bloggers often find that quality SEO research is the most time-consuming aspect of creating content for their blog. But, once you’ve done most of the work, why waste the time and do it all over again?
I track my keywords, long tail keywords, categories, trends, buzzwords, and any other SEO-related data I need to use during pin creation in a Google spreadsheet.
Not only does this save me hours of work, but it also keeps my SEO content consistent, accurate, and organized. I separate my keywords by category, and if I am writing content on a new topic, I do a brief search for relevant keywords and add it to my spreadsheet.
Tracking Keywords and Long-tail Keywords
If I am writing content that I’ve already done keyword research on, I just open up my spreadsheet and use the keywords from there.
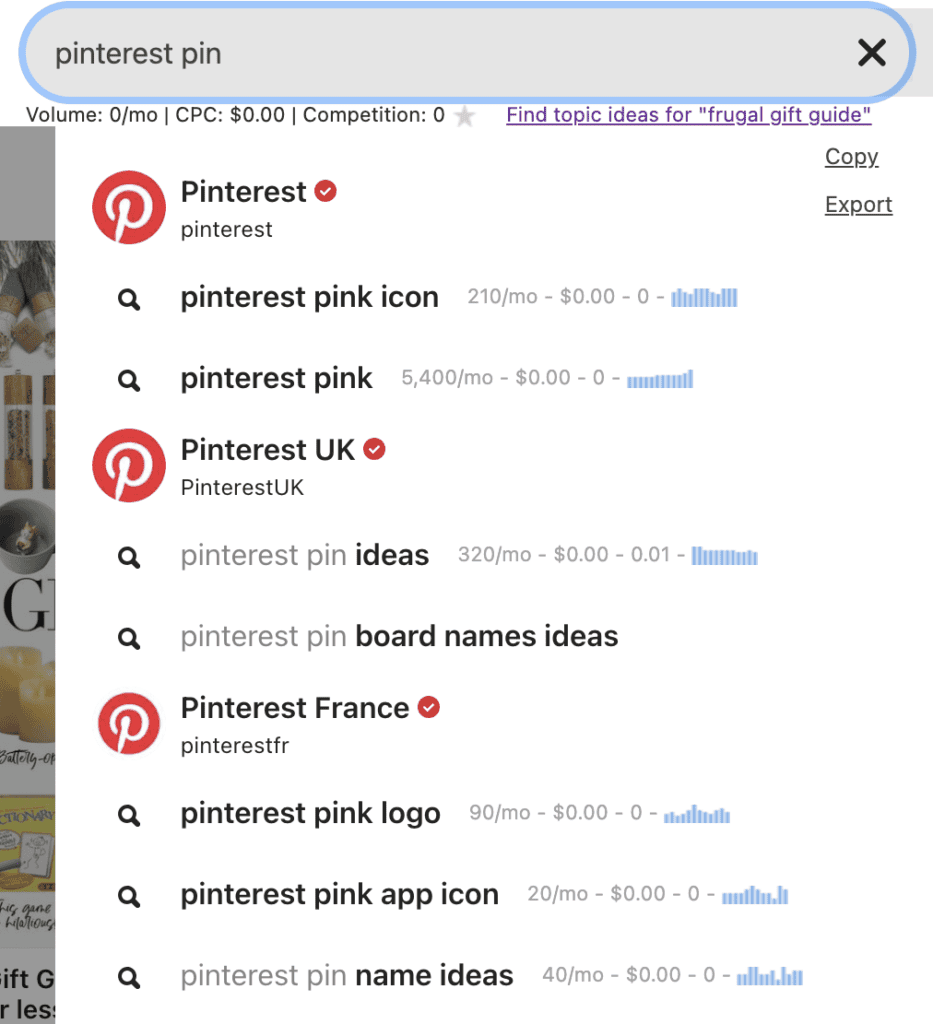
But, if you need to start keyword research from scratch, start with the Pinterest search bar. Type in the main keyword or topic you are writing about in your blog post and see what shows up in the drop-down list.
Your main keyword is what you searched for, and the long tail keywords are what Pinterest suggests.
In the screenshot I took below, my main keyword is Pinterest Pin. The long tail keywords are the suggestions like “Pinterest pin ideas”, “Pinterest board names ideas”, and “Pinterest pin name ideas”.
You’ll want to avoid adding long tail keywords that aren’t actually what your main keyword is though. The ones like “Pinterest pink icon” and “Pinterest pin”. These aren’t actually what you’re looking for, this is just Pinterest trying to fill in suggestions. So go ahead and ignore these.
And honestly, this method can be a great way for you to save time on your other SEO efforts. You can keep a spreadsheet for Google SEO, Pinterest SEO, and even your Email Marketing data.
Email marketing will require a bit of a different writing tactic than a search engine. So, keeping the analytical data from that in its own spreadsheet will be helpful too. This includes A/B split testing, open rates, best days and times, and such like that.

Here’s how I keep my spreadsheets organized for my keywords. I have the main keyword in one column, and long tail keywords in the following columns.

Tracking Tags and Trends
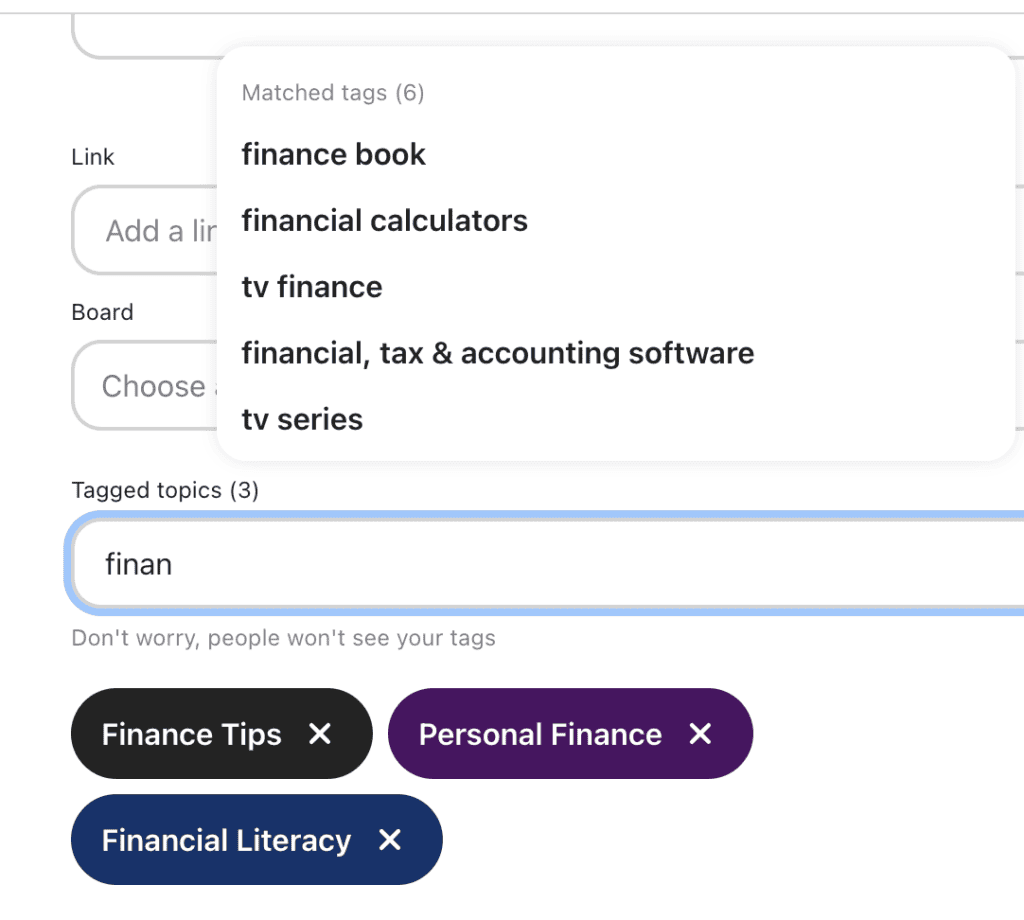
Similar to how you are tracking your keywords, you will also want to track your tags, and the trends for better Pinterest SEO.
In the Pinterest Native Scheduler, you will have the option to include tags for your pins. This, in addition to descriptions, titles, and boards, can boost your pin optimization.
By tracking these tags in a spreadsheet, and using the “edit all” option in the native scheduler, you save yourself time on both the research and the scheduling process.
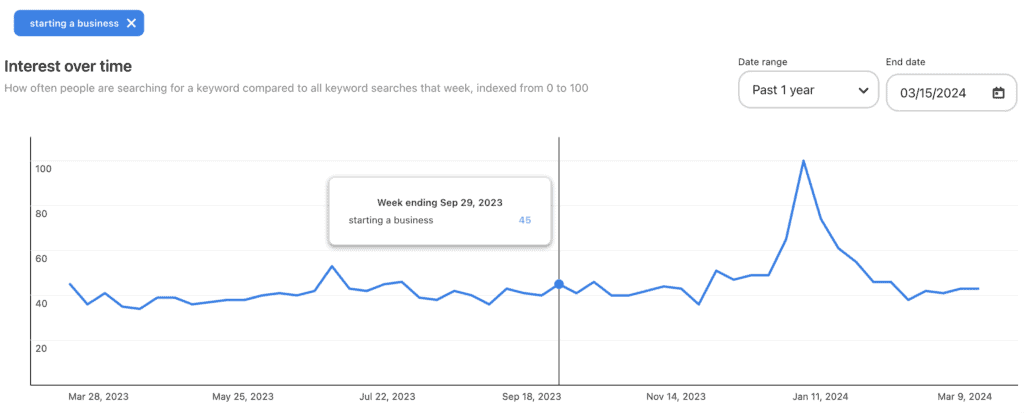
The Pinterest trends tool is a great way to learn about when a particular subject is trending. This can help you decide when to write about certain topics in your niche, and when to publish relevant pins so you can ride the popular seasonal trends for the best traffic potential.
Final thoughts on How to Bulk Create Pinterest Pins
Making pins will take some time, regardless of how many things you do to cut that time down. There’s just no way around it.
But, using tricks in Canva, like changing fonts, images, colors, elements, and other design options can save you from starting from scratch. You can also use pin templates so you can create a consistent look, while also saving time on pin creation.
Use the “edit all” option in the native scheduler to
And, lastly, you can save tons of time with keyword research by keeping all that data in a spreadsheet to avoid starting over each time.
What ways do you use to save time creating Pinterest pins?